This step by step guide will show you how to setup a fresh ColdCard Wallet, secure the seed phrase with CypherWheel, and make an air-gapped transaction using Sparrow Wallet.

Congratulations on deciding to take the radical responsibility of self-custody! You are one of the few brave souls destined for self sovereignty. Let's get your journey started off on the right foot and teach you how to setup your ColdCard for the first time, how to secure your seed phrase using the CypherWheel, and how to move funds onto and off of your ColdCard using Sparrow Wallet.
To get through this guide I recommend giving yourself two hours. Make sure you have the necessary materials so you can follow along with this step by step guide.
ColdPower 9v Battery Adaptor and battery
Balanced six-sided dice
Desktop or Laptop Computer
*I highly recommend thinking of the privacy implications while ordering Bitcoin related items. Using a PO Box to have your items shipped to will help ensure that your residential address is not stored on anyone's servers and subject to a data breach. Also consider using an alias along with a burner phone number & email address. Pay using bitcoin when possible to avoid having your fiat payment method linked.
Step 1: Unboxing
Once you receive your ColdCard, you will notice that it is shipped in a tamper evident bag that is uniquely identified with a Bag Number. Be sure to inspect this bag for any signs of tampering or foul play. If you have any hesitations or questions, take some pictures and reach out to support@coinkite.com.
Inside the bag you will find your ColdCard, A Wallet Backup Card, A duplicate Bag Number, and a honey badger sticker.
If you purchased the ColdPower 9v Battery Adaptor, then go ahead and plug a 9v battery into the bottom of the adaptor and then connect your USB cable to the adaptor and connect the Micro USB side to your ColdCard. You can use a standard USB wall wort for powering your ColdCard too. The basic idea I want to emphasize here is that we are going to be using the ColdCard in an air-gapped fashion which means we don't ever want it connected to a computer. You can use your ColdCard in a non air-gapped fashion but from my perspective that kind of defeats the purpose of a cold storage device.
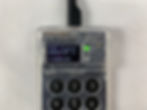
Here is a chart to help you navigate your new ColdCard. All of the buttons with a number on them act as that number plus the ones with an added symbol act as a secondary function to help you navigate through menus, enter a passphrase, or sign transactions.

Once connected, power on the ColdPower adaptor. You should be greeted with the Terms of Sale & Use agreement which you will need to confirm before proceeding. Then you will be presented with the Bag Number on the screen of your ColdCard. Compare this Bag Number to the one that your ColdCard was delivered in, they should match. If they don't match then contact support@coinkite.com immediately.
Step 2: Creating a PIN
Next, you will choose a PIN code for accessing your ColdCard. It is important to acknowledge that no one can help you in the event that your PIN code is lost. So make sure you write it down on the Wallet Backup Card that came with your ColdCard. I recommend using a PIN code that cannot be easily guessed, but the choice is entirely up to you. ColdCard PIN codes are split into two parts, the prefix & the suffix. Once you enter the prefix, the ColdCard will present you with two anti-phishing words. These words are generated using your PIN prefix and unique characteristics in your ColdCard. In the event that someone installs malicious firmware on your ColdCard while you are away, then the anti-phishing words presented to you after entering your PIN prefix will be totally different than what you expected.
The length of the PIN prefix & suffix can vary but I recommend using six digits for both the prefix and the suffix. Select "Choose PIN Code", enter and write down your PIN prefix, write down the anti-phishing words, then enter and write down the PIN suffix, and confirm.
Step 3: Create Wallet
Now you can create your wallet by navigating to "New Wallet" and selecting OK.

The ColdCard will use it's Random Number Generator to calculate a new private key for you. This private key is a really long and unique number, however, this number will be converted into a human readable format in the form of 24 English words. These 24 words are referred to as your seed words or seed phrase, sometimes called a mnemonic phrase.
You can choose to keep the seed phrase that your ColdCard generated. Or you can scroll down to the bottom of the list and find the option to press number 4 and then enter your own random numbers into the mix using a balanced six-sided dice. I recommend to leverage this option whenever possible. For each roll, you will press the corresponding number on the ColdCard. Do at least 100 rolls to obtain 256 bits of entropy.
Once you have made as many dice rolls as you like, press OK. Then your new 24 word seed phrase will be generated. Copy these words, in order, onto the Wallet Backup Card. Double check your work and then you will take a test to prove that you wrote your seed phrase down.
We will be using this Wallet Backup Card to help us construct our CypherWheel backup in a couple of steps. In the mean-time, I recommend ensuring that no one has access to your Wallet Backup Card and that you secure it like gold or jewelry. Do not take a picture of these words, do not save them in a digital format, and don't say them out loud.
ColdCard implemented the optional BIP39 passphrase, which is like having a unique 25th word added to your seed phrase. You don't have to use the passphrase option but it does offer some benefits if you do. Such as, if your 24 words are compromised then the attacker would still need your passphrase in order to access your funds. Or if an attacker found your ColdCard and your PIN then the optional passphrase would protect your funds.
Your ColdCard has no way of knowing if your passphrase is correct or not, any passphrase entered will generate a wallet. Whether that wallet is the one with your funds depends on your ability to secure your passphrase. ColdCard will generate a unique wallet finger print to help you identify that you have entered the correct passphrase and have accessed your wallet. Write down this finger print and keep it with your passphrase, then consider keeping your passphrase stored securely and separate from your seed phrase.
From the main menu, which is where you will be after you complete your seed phrase test, select "Passphrase" then "Edit Phrase". Then you will be able to choose from pre-determined words and variations of capitalization or you can enter your own high entropy random passphrase made from letters, numbers, special characters, or any combination there of. Make sure you write down the finger print once you have applied your passphrase. This passphrase will need to be entered each time you want to access this wallet.
Don't forget to periodically update the firmware on your ColdCard. CoinKite releases regular updates which you can find on their website here. Also, for detailed instructions on updating the firmware, check out my previous guide here. The ColdCard has a ton of other features that I haven't covered here such as scrambled PIN screen, time-lock feature, multisig wallet capability, BIP85 and a lot more. Checkout CoinKite's website to learn more.
Now that the seed phrase has been generated and a passphrase has been applied, you can set the ColdCard aside for now while I show you how to use your CypherWheel.
Step 4: Secure Seed with CypherWheel
Having your seed phrase backed up in a durable media such as stainless steel is a great way to protect against environmental hazards such as flooding and fire. Having the seed phrase written down on the Wallet Backup Card is great but it won't withstand fire or severe flooding. The CypherWheel is a great way to keep your seed phrase safe.
The basic idea is that you take the first four letters of each word in the seed phrase and insert the letters into a numbered pocket inside the CypherWheel. You can spin the exterior plate of the CypherWheel to see each pocket one at a time. Each side of the CypherWheel has 12 pockets in it, so there is a pocket for all 24 words.
You may be wondering why you only need the first four letters and not the whole word. The seed phrase that your ColdCard generated is based on a widely accepted industry standard called BIP39. Part of BIP39 calls out a standardized list of 2,048 words. No two words on this list share the same first four letter sequence. Or in other words, the first four letters of each word are unique compared to the rest of the list. Each word on the list corresponds to an index number between 0 - 2,047. That index number can be derived from an 11 bit binary string. These 24 11-bit binary strings were derived from your 256 bit private key with an extra 8 bits appended as a checksum for a total of 264 binary bits.
Upon opening your new CypherWheel you will find all the necessary materials to secure your seed phrase. In the kit you will have a CypherWheel, spring loaded punch, tweezers, tamper evident seal, some literature, a sticker, and a plastic box containing all the individualized steel letters you need.
Make sure you have your Wallet Backup Card handy and then simply select the appropriate first four letters of each word for the corresponding numbered pocket and slide them into place, then use the tip of the spring loaded punch to slide the letters all the way over to the left-hand side of their slot. After you have all four letter plates in place, then use the spring loaded punch to deform the pre-milled divot along the edge of the last letter to help hold it in place. Strike the divot twice.
Once your CypherWheel is complete, you can use the tamper evident seal to lock the outer plates from rotating. Simply align the outer plates with the through-hole in the CypherWheel and then make a small loop with the tamper evident seal cable. Pass the cable back through the open hole in the tamper evident seal and then twist a few times to tighten it up. Then you can break the plastic handle off of the seal.
CypherSafe also sells recovery tags to help you in case you need your derivation path during future wallet recovery. There are a variety of different tags for different wallets. Check out their website to learn more.
Let's see how well the CypherWheel can withstand extreme heat. In this video, I use an oxy/acetylene torch to bring the CypherWheel up to white hot temperatures just before melting point.
The CypherWheel handled the fire test very well. All of the words were recoverable.
Now you can rest assured that your CypherWheel will keep your Bitcoin seed phrase secure even under the harshest conditions. With you ColdCard set up and your seed phrase secure, you are ready to start transacting with bitcoin.
Step 5: Receive bitcoin
ColdCard enables you to receive bitcoin completely offline in an air-gapped fashion. You can display a QR code on your ColdCard and send bitcoin there. Alternatively, you can export a list of 250 receiving addresses using the MicroSD card. I'll show you how to do both so that you can send some funds to your ColdCard without connecting it to the internet.
After you have entered your passphrase and selected to use that wallet, from the main menu, select "Address Explorer". This will bring up a few address types that you can choose to view. Your ColdCard can use legacy P2PKH Bitcoin addresses that start with "1", or nested SegWit P2SH Bitcoin addresses that start with "3", or Native SegWit Bech32 Bitcoin addresses that start with "bc1".
I recommend just sticking with the addresses that start with "bc1" because they will use less data in their transactions and save you on miners fees.
Once you have selected your preferred address type, you can scroll down to view the list of receiving addresses. I recommend using them in order because if you skip too many addresses ahead and deposit funds there, then those funds may be over looked by other wallets. This is called the gap limit and some wallets only scan 20 addresses deep.
Alternatively by pressing the number 4, you can view your addresses QR codes. Then you can scan that QR code from your mobile phone and deposit bitcoin directly to your ColdCard. I recommend always double checking the address on your actual ColdCard against the address on your other device you are sending from.
Another capability the ColdCard has is exporting a list of 250 receiving addresses. Make sure you insert the MicroSD card. Then follow the same process as above where you chose the Address Explorer, then chose the Address Type. Then you want to press "1" and this will save the first 250 addresses to a .csv file on your MicroSD card.
You can then take this list of addresses to your desktop computer and use it as a cross reference for your Sparrow Wallet, among other things.
Step 6: Send Bitcoin
In order to keep your ColdCard air-gapped, we can utilize the Partially Signed Bitcoin Transaction (PSBT) to spend bitcoin from the ColdCard without ever connecting it to the internet. Basically, we will use the public information from the ColdCard called an XPUB to import into Sparrow Wallet on our desktop. By doing this, we will be able to generate receive addresses and QR codes, monitor the ColdCard's balance, and initiate PSBT's. All without exposing any of the private information from the ColdCard, like the signing key.
First we will need to write the .json file from the ColdCard which will contain all the public information necessary so that Sparrow Wallet can import this wallet. From the main menu select "Advanced" then "MicroSD Card" then "Export Wallet" then "Generic JSON".
This is going to write the file to the MicroSD card, then you can transfer that MicroSD card to your desktop computer. Now we will setup Sparrow Wallet so that we can create our PSBT and spend from our ColdCard. If you have not used Sparrow Wallet before, check out this beginners guide I wrote on setting up Sparrow Wallet from scratch.
Open Sparrow Wallet on your desktop and navigate to "File" then "New Wallet". Then enter a name for your new wallet and select "Create Wallet".
Next, select "Airgapped Hardware Wallet", then next to the ColdCard icon choose "Import File". Then navigate through the file explorer to the MicroSD card where you should have your .csv file of addresses and your coldcard-export.json file. Select the .json file.
On the next screen you should recognize the Master Fingerprint from the one you were given by the ColdCard after you applied your passphrase. All the other settings can be left on their defaults, then select "Apply" in the lower right-hand corner. Then if you want to set a password for your Sparrow Wallet, you will have that option. This is different than your ColdCard PIN code and also different than your ColdCard BIP39 passphrase. The password on your Sparrow Wallet is to encrypt your wallet data on your desktop.
After setting your Sparrow Wallet password, you should be looking at your Sparrow Wallet home screen. On the left-hand side, you will see a few different tabs. If you select the "Receive" tab then you can view the first receiving address from your ColdCard and its QR code. You can also open the addresses.csv file with NotePad to view the 250 addresses you exported from your ColdCard and compare them to your Sparrow Wallet just for the added assurance.

If you followed my Sparrow Wallet guide then you should have your Sparrow Wallet connected to your own node. But if you don't have your own node yet, that's ok. By toggling on the switch in the lower right-hand corner from the Sparrow Wallet user interface, you will observe that it changes its color to yellow, indicating that your Sparrow Wallet is now communicating with a public Electrum server to gather your wallet's balances based on the information available through scanning the Bitcoin blockchain. Since you are not referencing your own copy of the Bitcoin blockchain with your own node in this scenario, you are relying on other people's nodes to tell you the information you need. Using public electrum servers is the least private way to use Sparrow Wallet and the more private options would be to setup your own Electrum server or your own Bitcoin full node.
You can see that once I toggled on the switch in the lower right-hand corner to communicate with the public Electrum servers, it turned yellow and the 100,000 sats I spent from my Samourai Wallet to my ColdCard are now showing as a pending deposit.

After a few blockchain confirmations, the mempool balance drops to zero and the wallet balance remains 100,000 sats. This means that we now have confirmation that 100,000k sats is in fact deposited to the ColdCard.

In order to spend the funds from the ColdCard, simply navigate to the "Send" tab and then initiate the PSBT process by inserting the address you would like to spend to, a custom label, the amount you would like to spend, and the miners fee. After entering those details, select the "Create Transaction" button in the right-hand lower corner.

Next you will be able to review the details and finalize the transaction. Then on the next screen, select "Save PSBT". Then navigate to the MicroSD card from the file explorer and save the PSBT there.
Remove the MicroSD card from your desktop and insert it back into your ColdCard. If necessary, power on your ColdCard using the ColdPower 9v battery adaptor or USB wall wort. Then enter your ColdCard PIN prefix, verify your anti-phishing words, and enter the PIN suffix. From the main menu choose "Passphrase" and apply your passphrase and verify the wallet finger print is correct. Once you have selected to work from that wallet then from the main menu, choose "Ready to Sign". Then you will be displayed the details of the PSBT and you can confirm that the address and the amount and the miners fee are correct.
Then hit OK to sign. Once the file is signed it will be saved as a new file to the microSD card. You can then eject the MicroSD card and securely log out of your Cold Card and power it down.
Back in Sparrow Wallet now so that you can broadcast the signed transaction to the network. Insert the MicroSD card to your desktop, then from the same screen you left off at in Sparrow Wallet, select "Load PSBT". Then navigate to the MicroSD card and select the signed .psbt file. After the file loads, select "Broadcast Transaction" and that is how you spend from your ColdCard in an air-gapped fashion.
You should be able to track your transactions progress using the transaction identifier (TXID) on sites like MemPool or Blockstream.
Sparrow Wallet has a ton of other features that I'm not covering here such as advanced networking options for connecting to your own node, block exploration details, helpful tool tip dialogs when inspecting transaction hex data, multiple wallet type support, and a lot more. Check out Sparrow Wallet's website to learn more.
Conclusion:
When you are finished with your ColdCard, securely log out of it and power it down. Then make sure to store it in a safe and secure location. Be mindful of where you store your Wallet Backup Card too, it is best practice to keep the Wallet Backup Card separate from your ColdCard in the event someone else gains access to it.
The same goes for your CypherWheel, make sure you store it in a safe and secure location and that it is not stored with your ColdCard.
I also recommend utilizing the password feature on your Sparrow Wallet in the event that someone gains access to your desktop or laptop computer.
If you use the tips in this guide to inform your decisions around self-custody then you should be well prepared for just about anything.
In this guide you learned how to setup your ColdCard PIN, passphrase, and add your own dice roll entropy to your private key. Then how to secure your seed phrase in a robust CypherWheel. And if you stuck with me through the whole guide, you also learned how to send bitcoin to your ColdCard and how to Spend bitcoin from your ColdCard using Sparrow Wallet. I hope that you enjoyed this article and that it got you thinking about ways that you can safe guard your bitcoin when you decide that self-custody is right for you.
If you enjoyed this content, leave me a tip here: Donate.
This article can be found on Twitter as a thread here.